Embedding the Web Player
In this guide, we'll cover how to start a live stream on the NativeFrame platform as a broadcaster and view this live stream in another tab as a viewer using the WebRTC encoder and player.
Prerequisites
- A NativeFrame Cloud account
- Node Version >= 18
Project Setup
- From the dashboard, click Projects.
- On the All Projects page, click the Create new project button.
- Choose Manual project, provide a project name, slug, and description and create the project.
Starting a Stream
- With this new project selected, click on Streams.
- Create a new stream.
- Navigate into the Stream Details page by clicking the stream name.
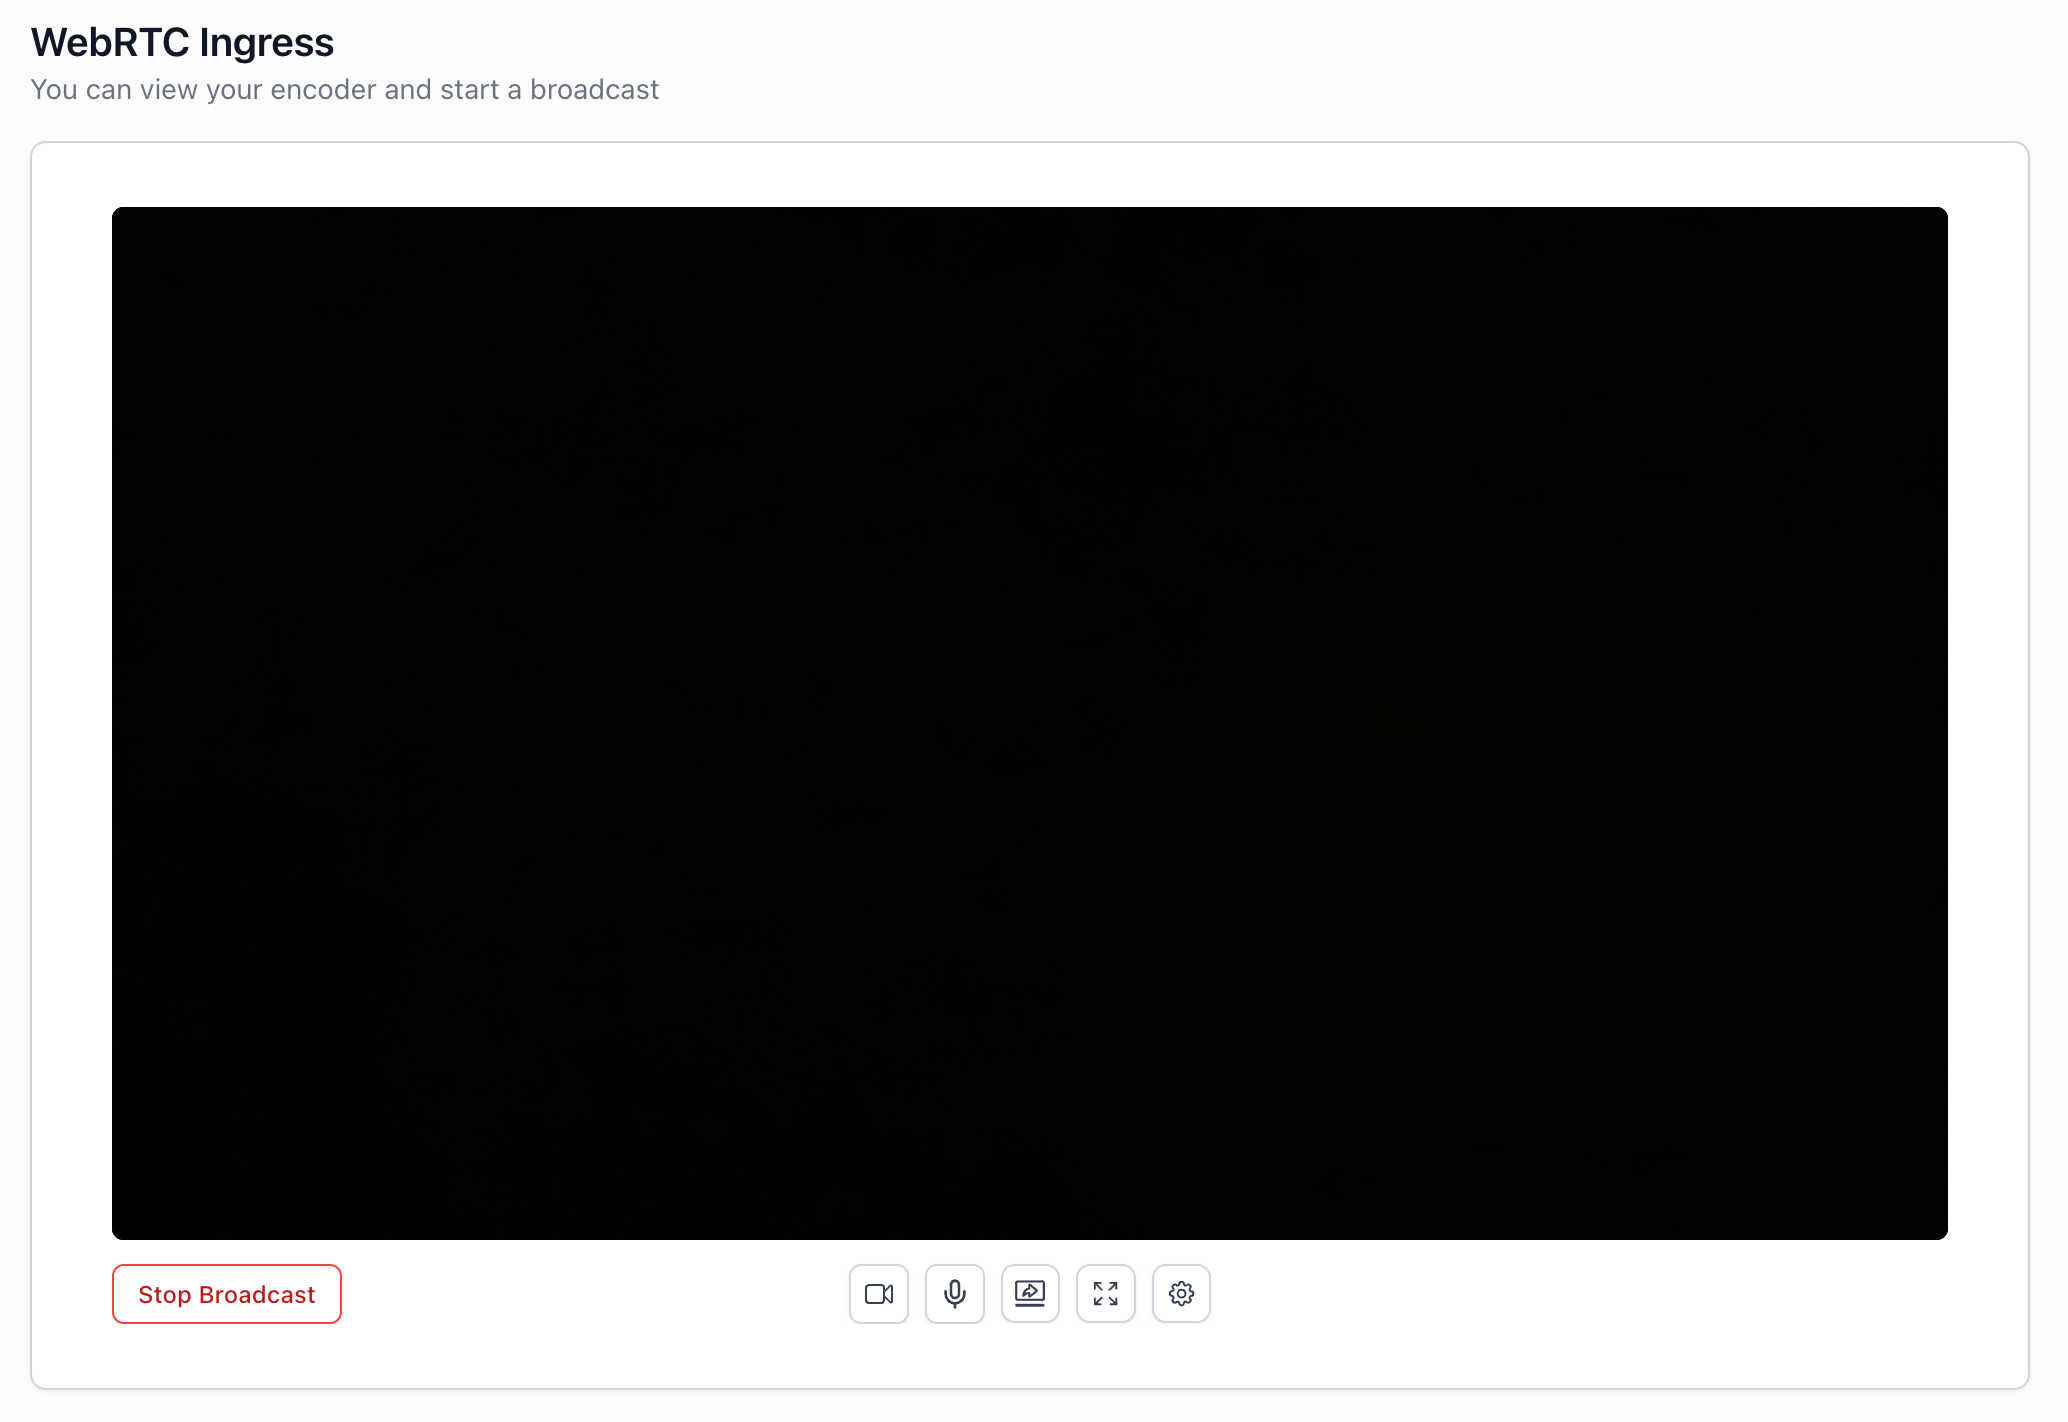
- On the Stream Details page, navigate to the WebRTC Ingress tab and if prompted, provide access to the webcam and microphone.
- Click Start Broadcast.
Now that we have an active stream, let's view this stream in the next section.
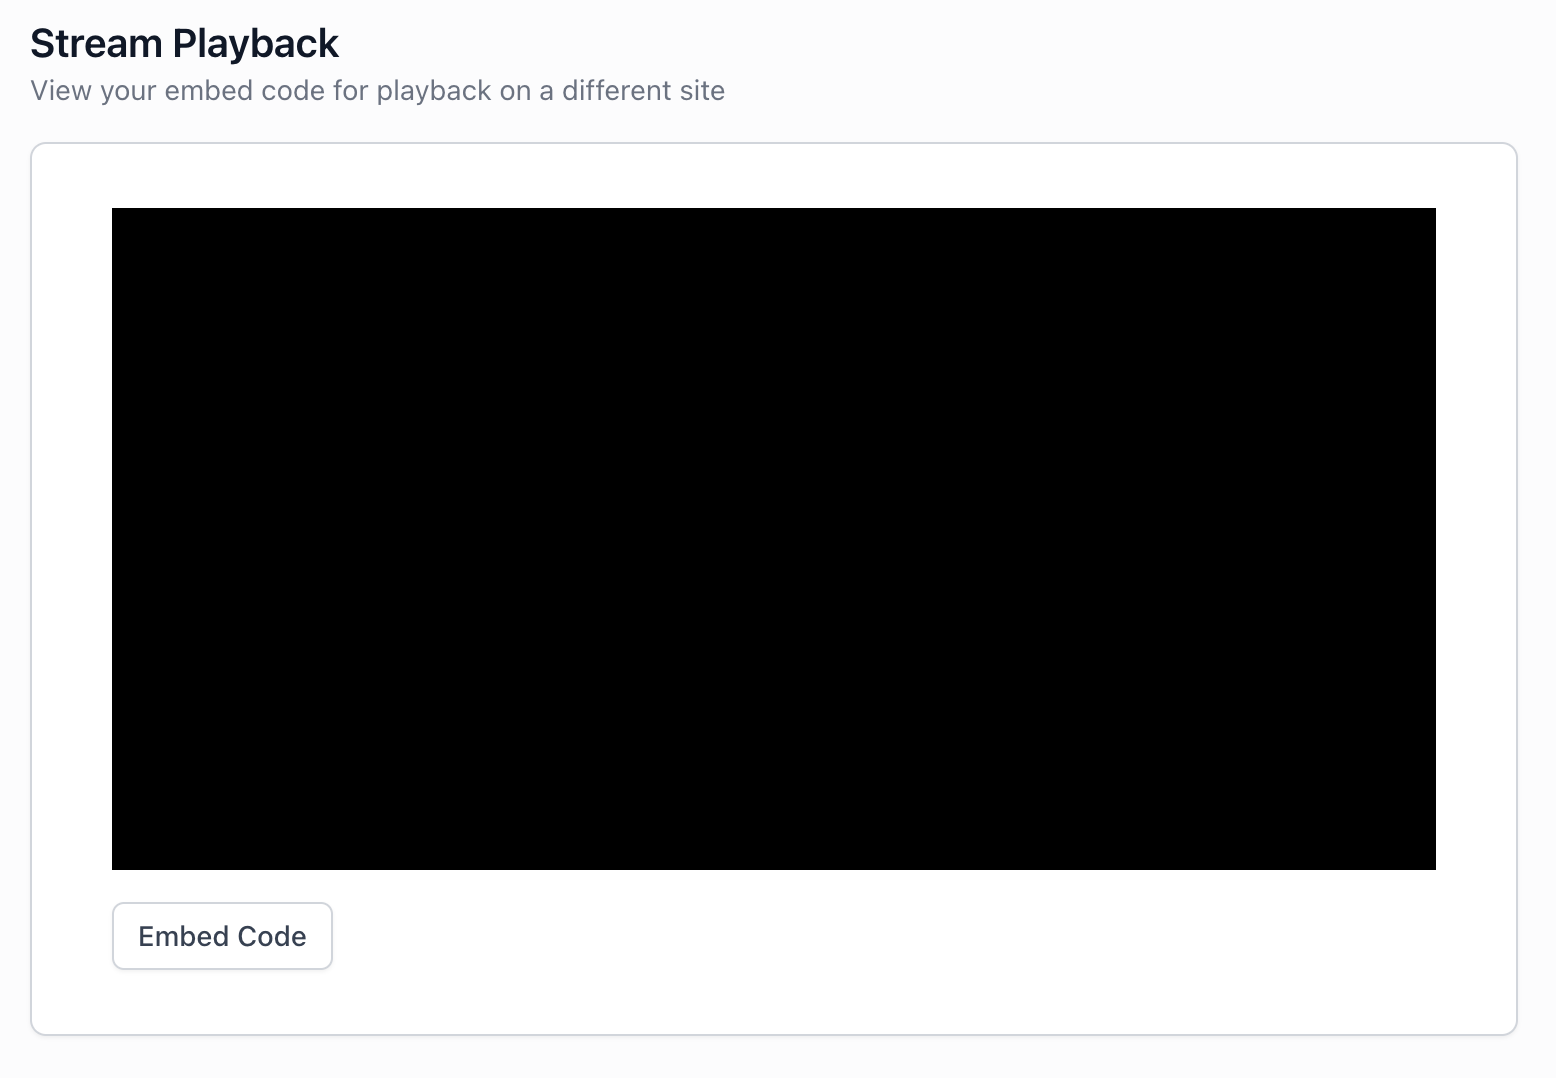
Stream Playback
There must be an active broadcast for this to work
- From the Stream Details page, open the Stream Playback in a new tab.
- Refresh the Stream Playback tab and there should be a Play Stream button.
- Click the Play Stream button to view the live stream.
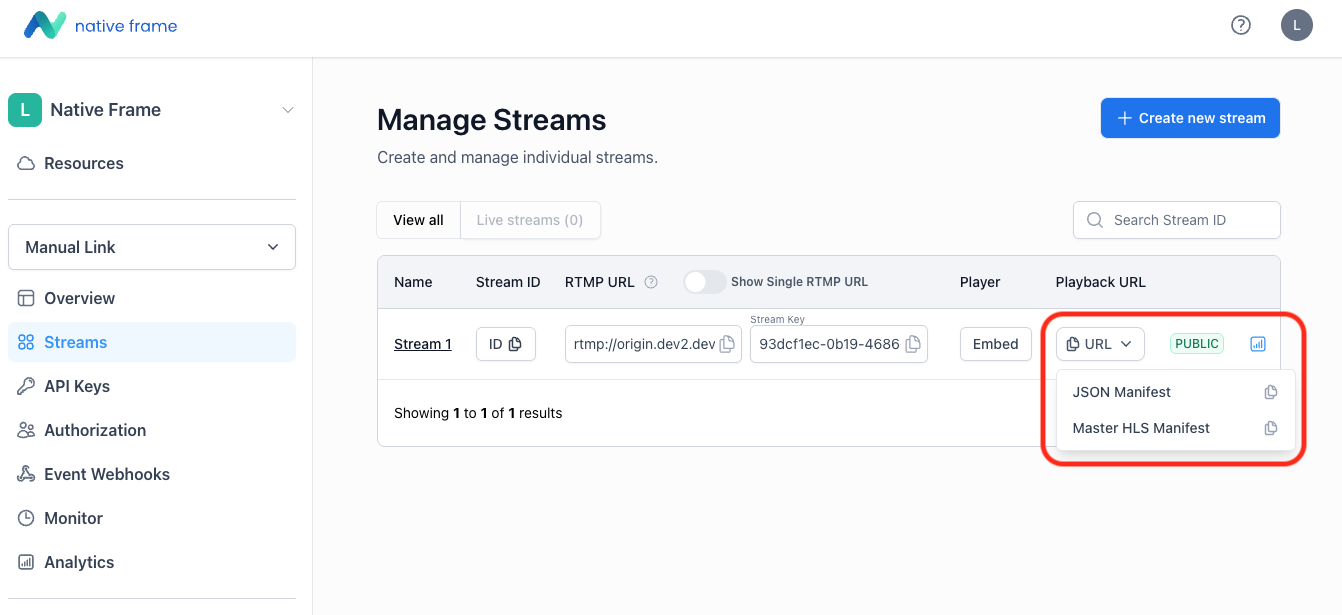
Playback URLs
You can access playback URLs for your stream from the Streams page. Click the URL dropdown in the Playback URL column to view the available options:
- JSON Manifest - Use this URL with the NativeFrame player SDK to initialize and play the stream.
- Master HLS Manifest - The master HLS playlist URL for use with any HLS-compatible player (e.g., hls.js, Video.js, or native browser support on Safari/iOS).
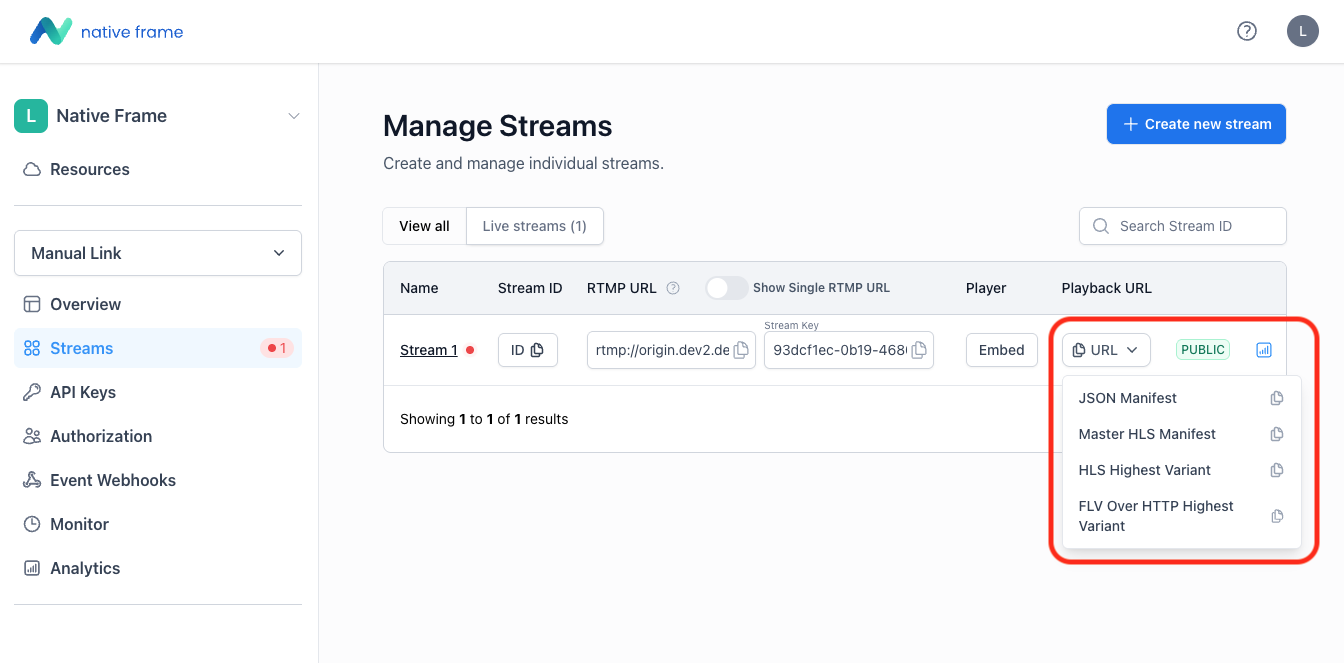
When the stream is live, additional playback URLs become available:
- HLS Highest Variant - Direct URL to the highest quality HLS variant. Useful when you want to bypass adaptive bitrate selection and always serve the best quality.
- FLV Over HTTP Highest Variant - FLV stream over HTTP for use with players that support FLV playback, offering lower latency than HLS.
Embedding the NF Player
Embed the player in your own application to make the live stream available on your website.
Introduction
NativeFrame offers a powerful and flexible video player that can be easily embedded into various types of websites. This guide will walk you through the process of integrating the NativeFrame player into your web presence. Whether you're using a website builder like Squarespace or Webflow, a content management system like WordPress, or a custom HTML website, the core concept of embedding the player remains the same: you’ll need to insert an iframe that loads the NativeFrame player.
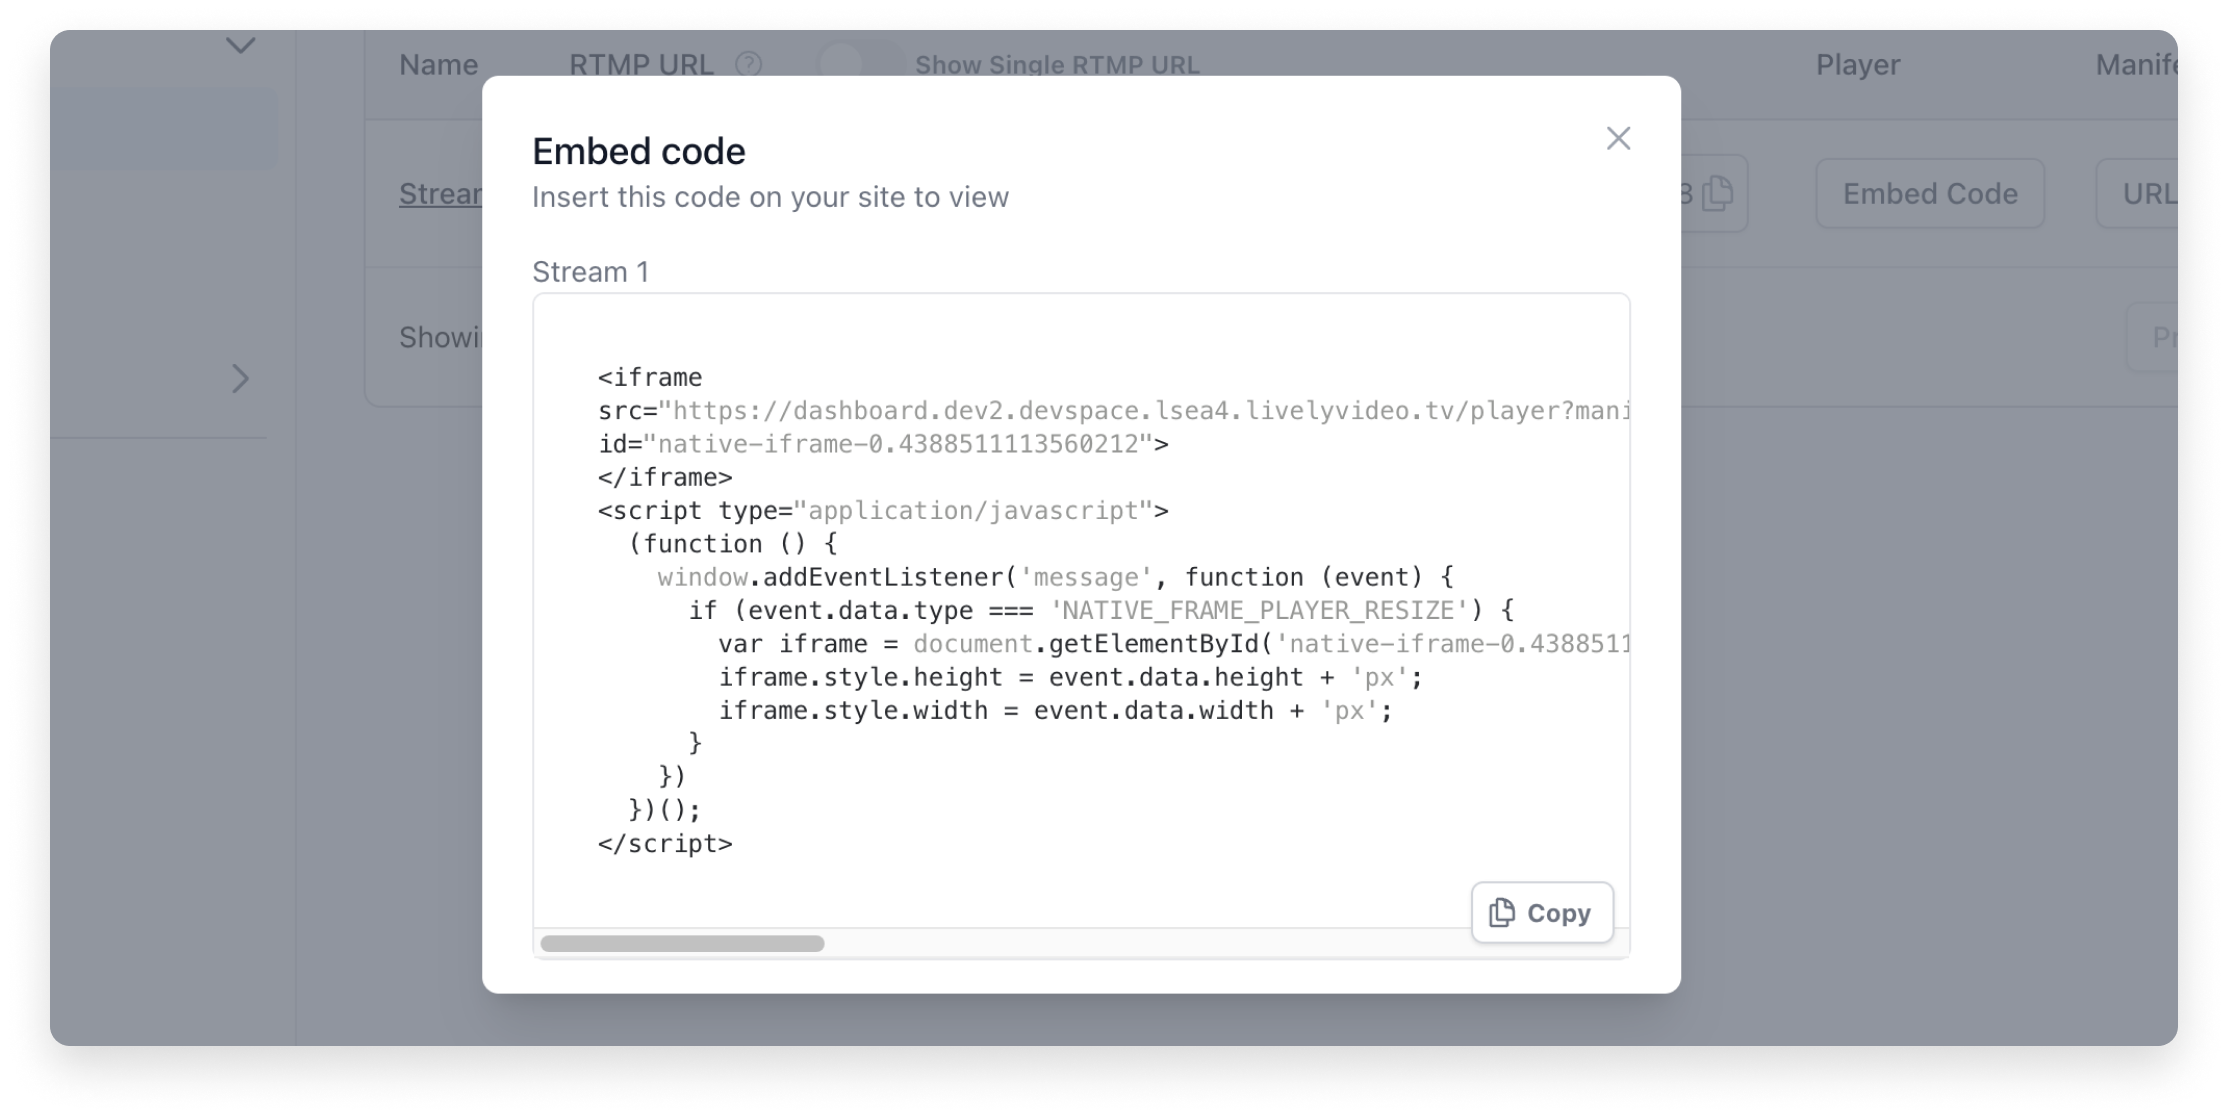
What is an iframe?
An iframe (inline frame) is an HTML element that embeds another HTML document within a webpage. Key points:
- Defined using the
<iframe>tag - Can load content from different domains
- Has its own scrollbars and can be styled with CSS
- Widely supported across modern browsers
For video players like NativeFrame, iframes provide a convenient and secure way to embed content without handling complex video playback logic.
General Steps for Embedding
Regardless of the platform you're using, the general process for embedding the NativeFrame player involves the following steps:
1. Obtain your player URL
-
Log in to your NativeFrame dashboard
-
Navigate to the player settings or stream management section
-
Locate the stream you want to embed and select “Embed Code”
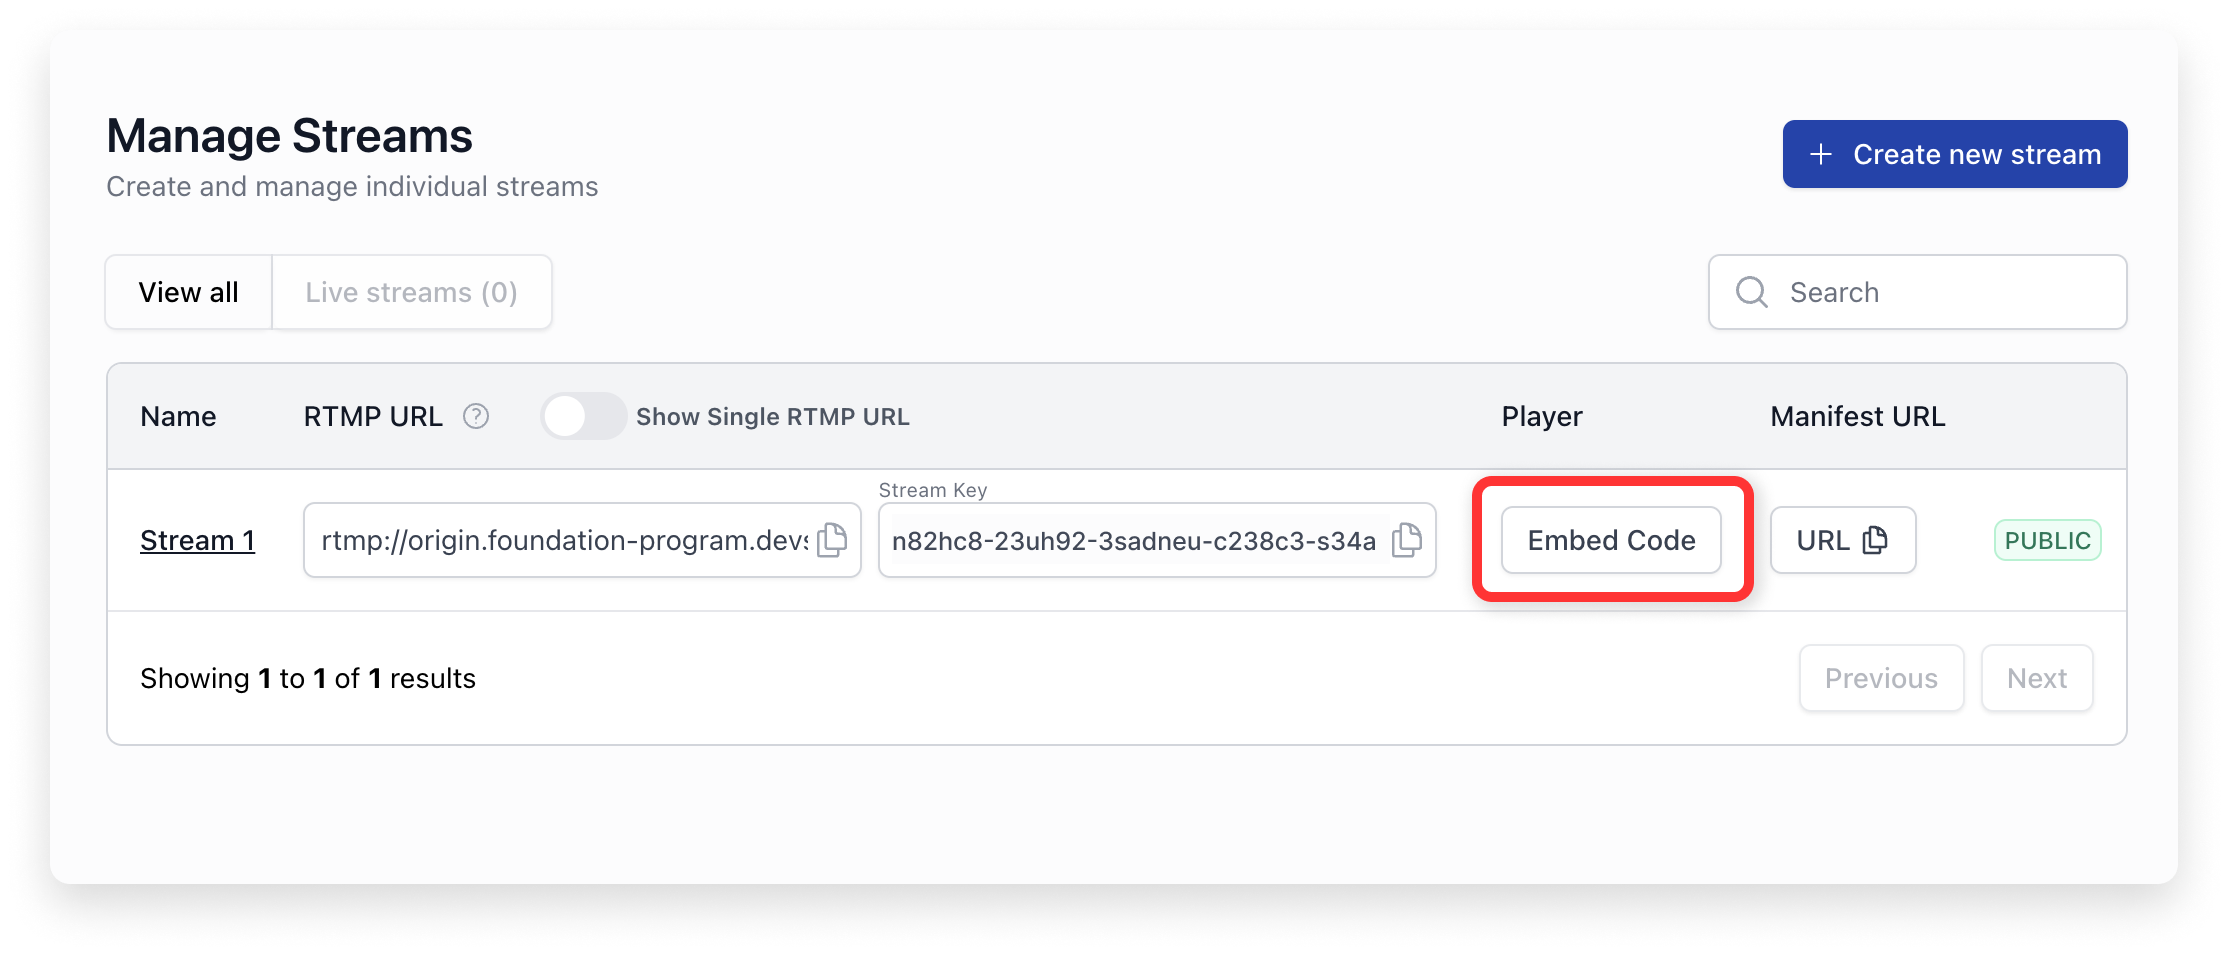
-
Copy the provided embed code or player URL
These steps form the basis for embedding across all platforms. The following sections will cover platform-specific instructions.
Embedding in Web Builders
Both Squarespace and Webflow provide user-friendly interfaces for embedding custom code, making it straightforward to integrate the Native Frame player into your site.
Square Space
Squarespace makes it easy to embed custom code, including iframes, into your pages. Here's how to add the Native Frame player to your Squarespace site:
- Navigate to the desired page.
- Click "+" to add a new block.
- In the menu that appears and select "Code".
- Paste your Native Frame player iframe code.
- Click "Apply" and adjust layout as needed.
Webflow
Webflow offers a similar process for embedding custom code:
- Open your project page.
- Click "+" in the Elements panel.
- Search for and add the "Code Embed" element.
- Paste your Native Frame player iframe code.
- Click "Save & Close" and adjust design as needed.
Remember to test your embedded player on various devices and screen sizes to ensure a good viewing experience for all your visitors.
Embedding in Content Management Systems
WordPress is one of the most popular content management systems, and it offers several ways to embed the NativeFrame player.
Here are two common methods:
Method 1: Using the WordPress Block Editor (Gutenberg) Create or edit a post/page
- Click "+" to add a new block.
- Select "Custom HTML" block.
- Paste your Native Frame player iframe code.
- Preview to check appearance.
Method 2: Using the WordPress Classic Editor
- Create or edit a post/page.
- Switch to the "Text" tab.
- Paste your Native Frame player iframe code.
- Switch to "Visual" tab to preview.
You can not embed HTTP pages into HTTPS pages and vice versa.So the protocol (HTTP or HTTPS) for parent and embedded page should match.
Embedding in Custom HTML Websites
For developers working with custom HTML websites, you have the most flexibility in how you implement the Native Frame player. Here are some tips on how to embed the player:
Basic Embedding
- Open your HTML file in a text editor or your preferred IDE.
- Locate the section of your HTML where you want the video player to appear.
- Insert the Native Frame player iframe code.
Best Practices
Here are some final tips to ensure the best implementation of your Native Frame player:
- Test Across Devices: Always test your embedded player on various devices and screen sizes to ensure a consistent experience for all users.
- Monitor Performance: Keep an eye on your website's performance after adding video content. If you notice significant slowdowns, consider optimizing your implementation or reducing the number of embedded videos on a single page.
- Stay Updated: Keep your Native Frame integration up to date. Check the Native Frame documentation regularly for any updates or new features that could improve your video playback experience.
- Ensure Compliance: Be aware of privacy laws and regulations (like GDPR) that may apply to your use of embedded video content.
- Optimize for SEO: While the video content in an iframe isn't directly crawlable by search engines, you can still optimize for SEO by providing relevant text content around your videos and using appropriate schema markup.
- Consider User Experience: Think about how the video fits into the overall user journey on your site. Place videos where they'll have the most impact and consider autoplay settings carefully.
By following the steps and best practices outlined in this guide, you should be well-equipped to successfully integrate the Native Frame player into your website, regardless of the platform you're using. Remember, the goal is to provide your users with a seamless, high-quality video experience that enhances your content and keeps viewers engaged.
Advanced settings
1. Adjust iframe Size and Attributes
You can add and set the width, height, and other iframe attributes to control the size and look of the player. Below are some common iframe attributes:
| Attribute | Description |
|---|---|
allow | Specifies a set of extra restrictions on the content that can be loaded in an <iframe> |
allowfullscreen | Indicates where the <iframe> can be displayed in fullscreen mode |
height | Sets the height of the <iframe> element |
width | Sets the width of the <iframe> element |
loading | Specifies how the contents of the <iframe> should be loaded |
src | Specifies the URL of the document to embed in the <iframe> |
Related Resources
For more information and to optimize your use of the Native Frame player, explore these related topics within our documentation:
- Native Frame Player API: Detailed information on player customization and control via API.
- Authentication and Authorization: Understand how to secure your streams and manage viewer access.