Auth0 Integration Guide
This guide will walk you through integrating Auth0 with the Native Frame platform.
This guide uses configurations to test with the Native Frame demo app. If you are looking to integrate Auth0 with an existing application, those values will be called out throughout this guide.
Concepts
Before we get started with the integration guide, we'll walk through a few important authentication and authorization concepts with live streaming on the Native Frame platform. A live stream can either be public, open to unauthenticated users (guests), or private, meaning that the viewer must be granted permissions to watch the stream.
There are x roles to a live streaming event
- The
broadcasterrole - The
viewerrole
Authorization on the Native Frame platform is performed by the @video/token custom claim added to an authenticated user's JWT. In this custom claim lives a roles property that includes the authorization roles, e.g. broadcaster, viewer. The @video/token custom claim also contains information such as the streamId and other metadata about the stream. Below is an example of the custom claim:
{
  "@video/token": {
    "data": {
      "displayName": "Bob",
      "mirrors": [
        {
          "clientEncoder": "SaaS",
          "clientReferrer": "018e9bb4-a773-7e7c-8e72-c429fb777ca8",
          "id": "2b18f648-135e-4e6e-9a0b-7c8150c5db09",
          "kind": "pipe",
          "streamKey": "2b18f648-135e-4e6e-9a0b-7c8150c5db09",
          "streamName": "stream"
        }
      ]
    },
    "expire": "2024-05-23T01:01:42.111543433Z",
    "scopes": [
      "broadcaster"
    ],
    "token": "18254093e0ec4df1a261740bba78f136",
    "userId": "2744fdef-79c1-45b9-834e-dce9e532fff1"
  },
  // Other standard JWT claims, such as sub, iss, etc.
}
This integration will allow Auth0 to reach out to Native Frame to obtain this metadata during the Auth0 login process, before a JWT is granted to the client (user).
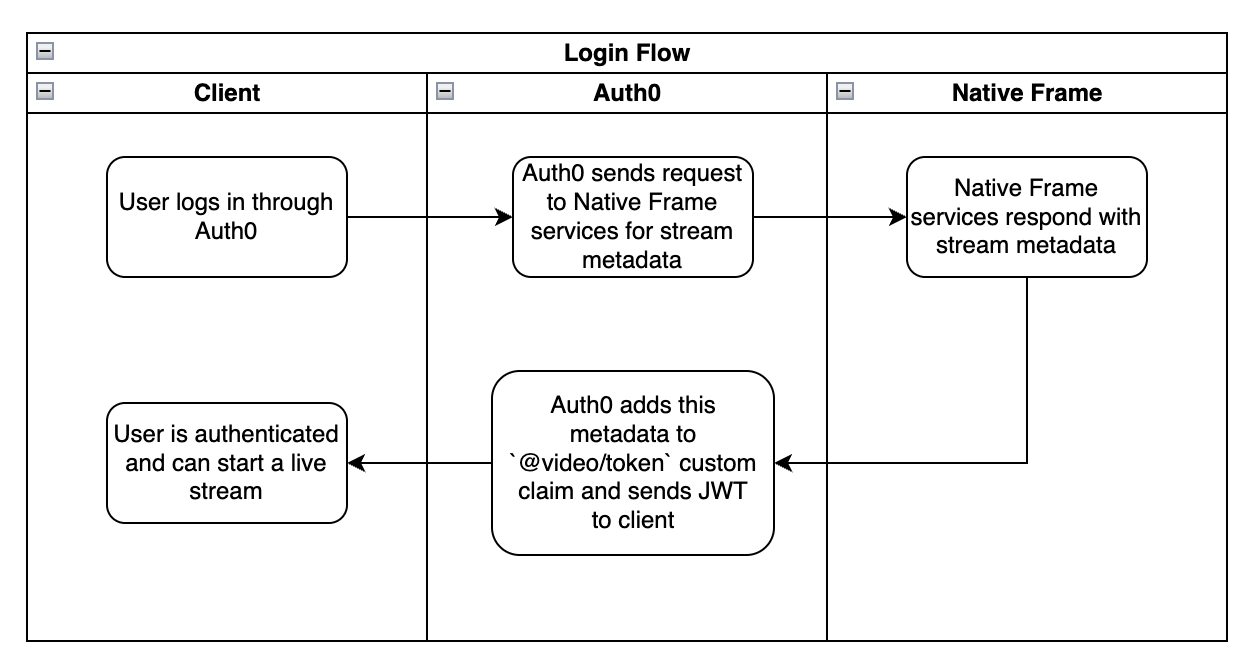
There are three areas of configuration throughout this guide. They are:
- The Auth0 single page app and API app
- The Native Frame project, administered from the Native Frame dashboard
- The demo app used for testing this implementation. This can be found on GitHub here.
Integration Guide
Before we begin, you will need the following data:
- A Native Frame Project ID - details on how to obtain the project ID are below
- The Native Frame Host - this is
www.nativeframe.com - A Native Frame Service Account JWT - steps to create are below
Creating a Native Frame Service Account JWT
- First we need to create a Native Frame service account JWK and JWT to use with Auth0. From the Native Frame dashboard, select the project you will be using for this integration.
This must be a manual project type.
- Select “API Keys” and under “JSON Web Key Sets (JWKS)”, create a new JWK. For the “JWK Alias” enter “Auth0 Service Account” and select “Service Account” as the “Role”.
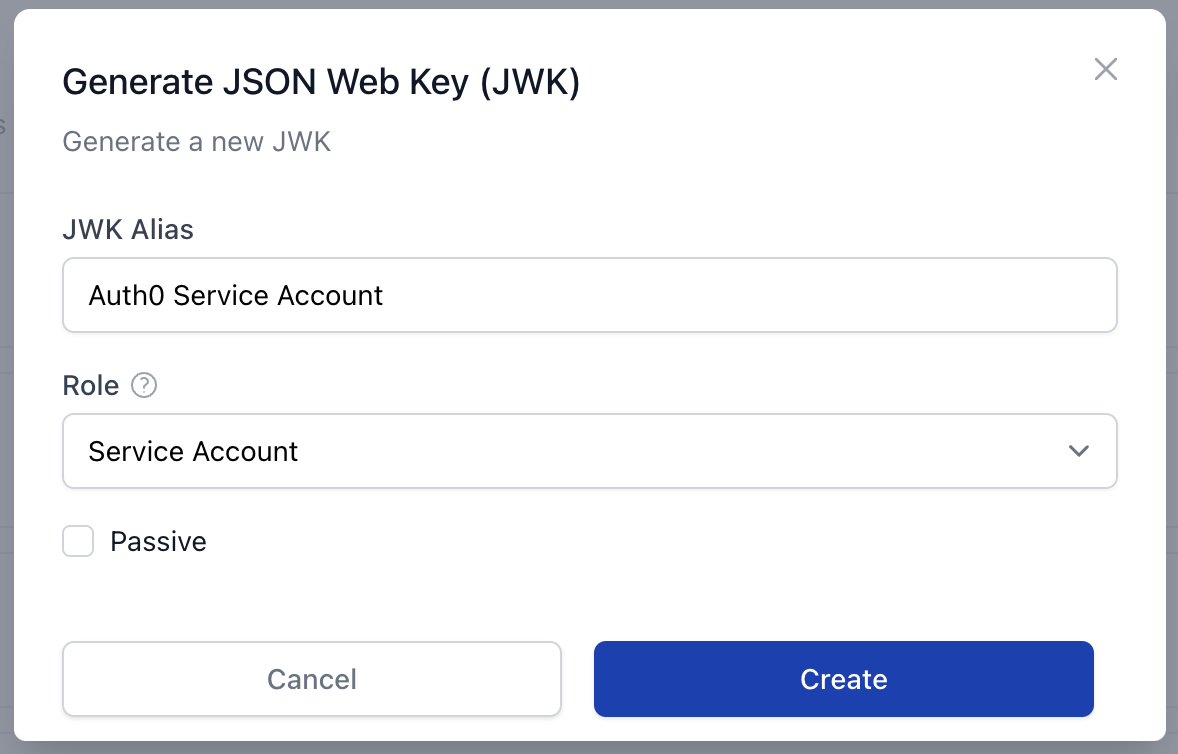
- Create a JWT from the newly created JWK by clicking the "Generate JWT" button. Copy this token, we will use it shortly.
Add Auth0 as an External Issuer
Next we need to add Auth0 as an external issuer in the Native Frame dashboard. From the Native Frame dashboard, navigate to “API Keys” and add a new “External Issuer”. The Issuer and External JWKs URL will include your Auth0 single page app's domain and should be in the following format:
- Issuer:
https://{AUTH0_DOMAIN}/- For example:
https://dev-c7487lvy5pa6ai7i.us.auth0.com/
- For example:
- External JWKs URL:
https://{AUTH0_DOMAIN}/.well-known/jwks.json- For example:
https://dev-c7487lvy5pa6ai7i.us.auth0.com/.well-known/jwks.json
- For example:
Creating the Auth0 Single Page App & API App
First we need to create the Auth0 single page app. From the Auth0 dashboard, select “Applications” > “Applications” and click “Create Application”. Enter a name for this app, such as “Native Frame” and choose an application type of “Single Page Web Applications”.
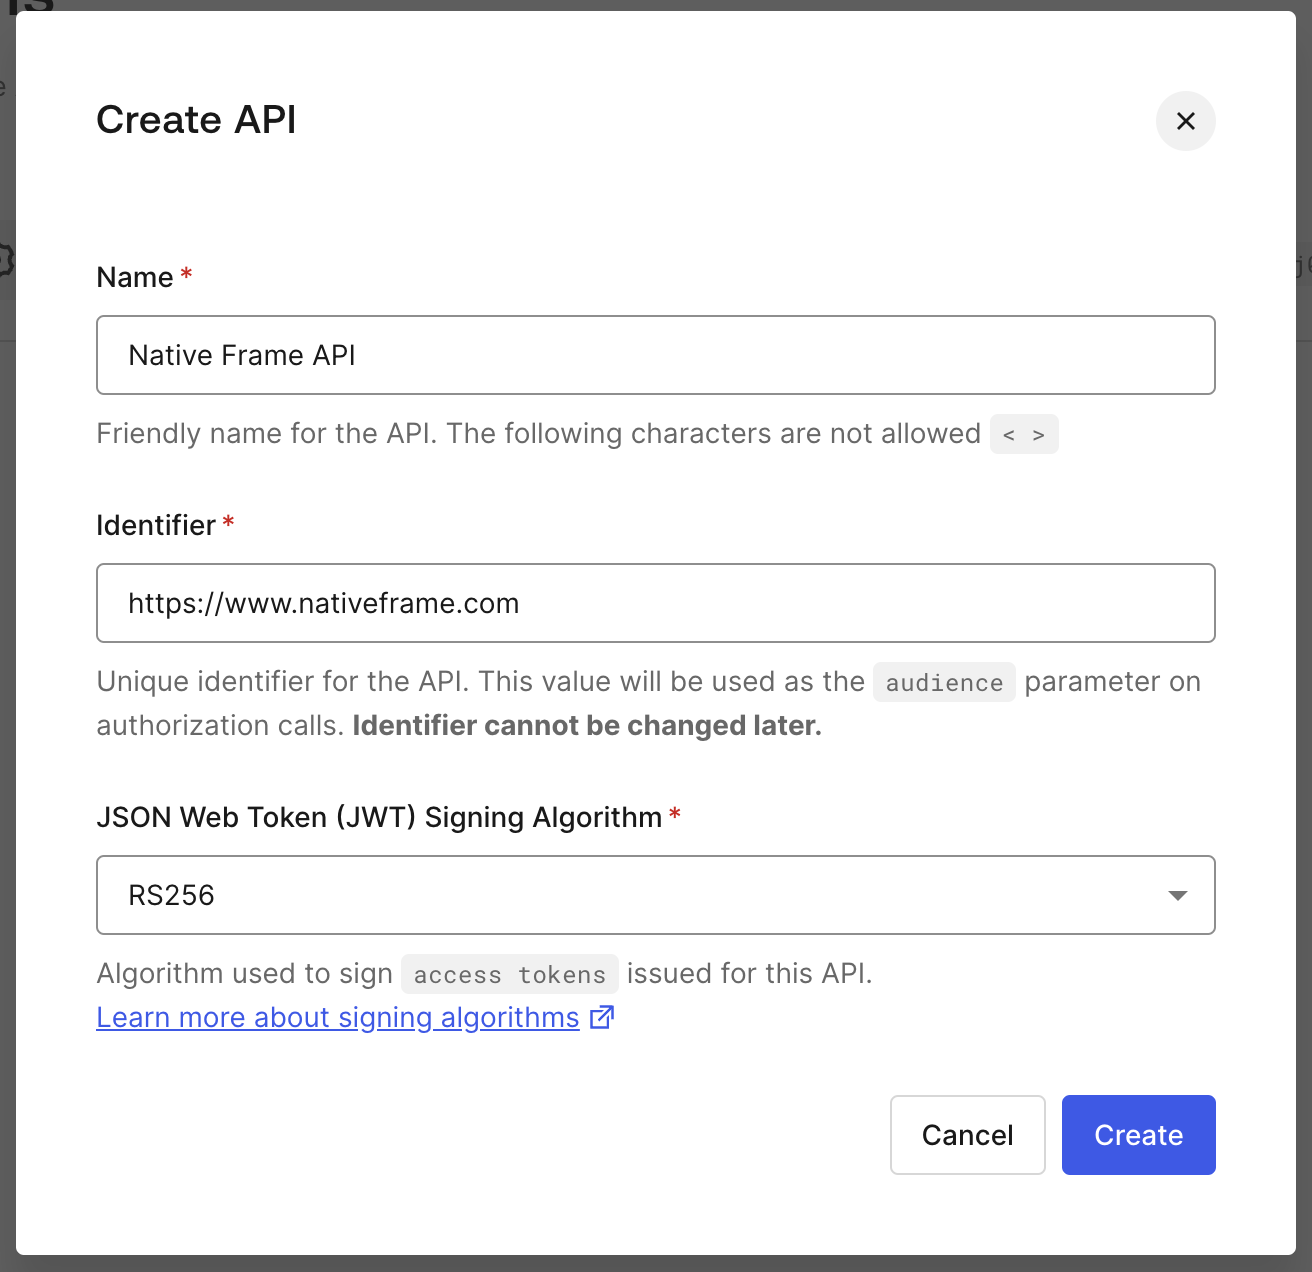
Next, let's create an Auth0 API app. From the dashboard, select “Applications” > “APIs” and click “Create API”. Enter a name for the API such as “Native Frame API”. Add https://platform.nativeframe.com as the Identifier and click “Create”.
Configuring the Auth0 Single Page App
Now we need to configure the Auth0 single page app. From the dashboard, select “Applications” > “Applications” and click on the Native Frame single page app. From the “Settings” tab, populate the following fields
- Set “Allowed Callback URLs” to
http://localhost:3000 - Set “Allowed Logout URLs” to
http://localhost:3000
These values are used for testing purposes with the Native Frame demo app and will need to be updated with the URLs for your video app once the time comes to integrate.
Creating the Native Frame Roles in Auth0
Now we need to create the Native Frame roles for the different types of authorization, broadcaster, and viewer. From the Auth0 dashboard, navigate to “User Management” > “Roles” and create the broadcaster and viewer roles.
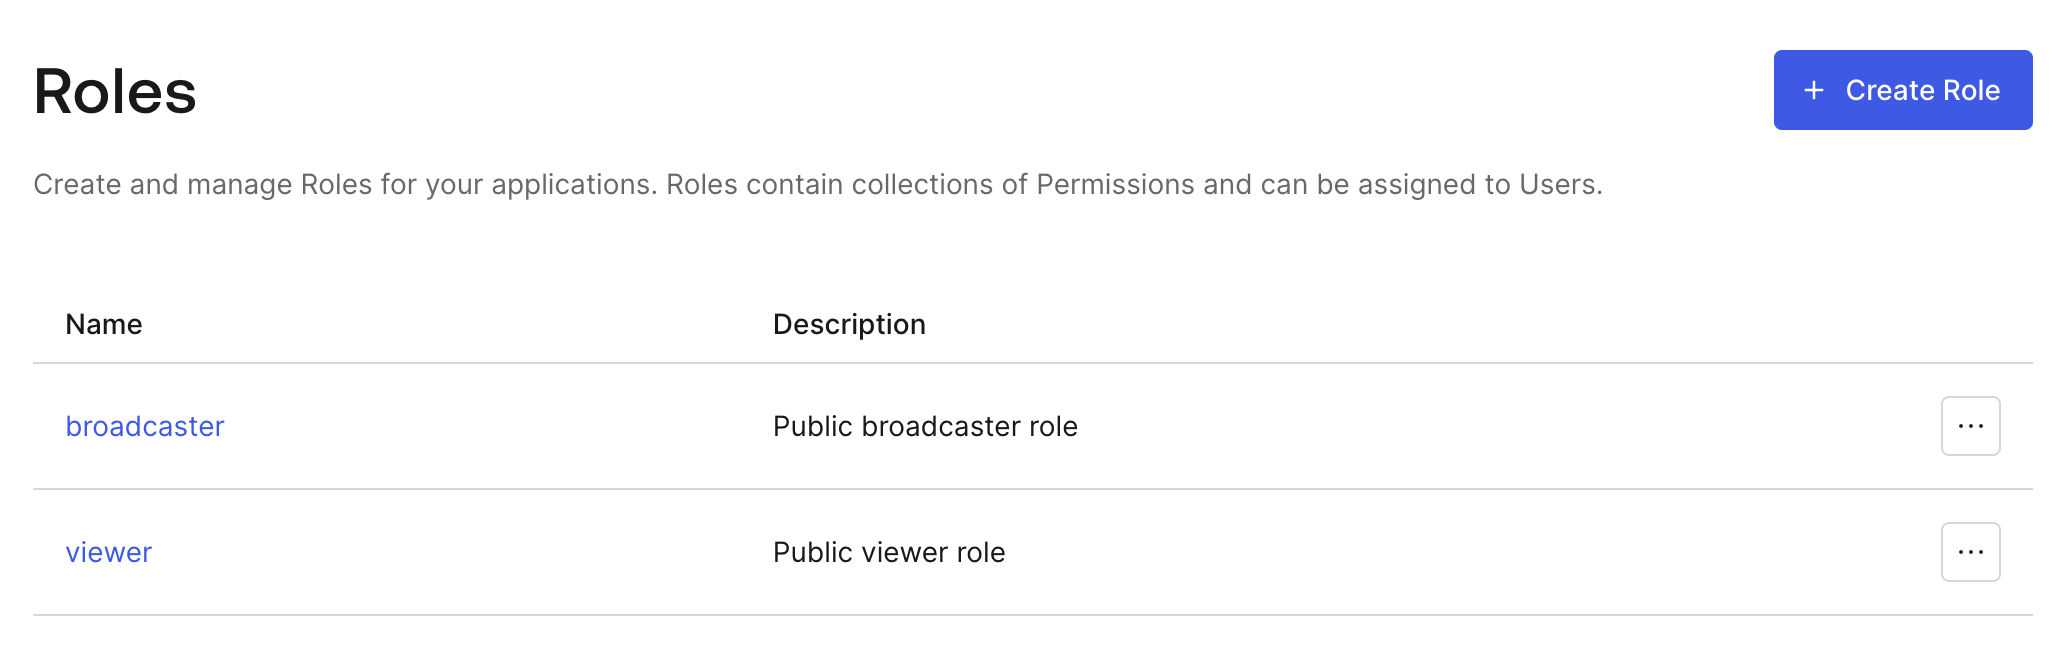
We will associate these roles to a user account at the end of this guide, as the user account does not currently exist. This will be created from the demo app, once configured.
Adding a Custom Login Action
Now we'll walk through how to add the logic to our Auth0 app that will create a custom claim on the user's JWT with the Native Frame stream metadata.
-
Navigate to "Actions" > "Triggers" and select "Post Login"
-
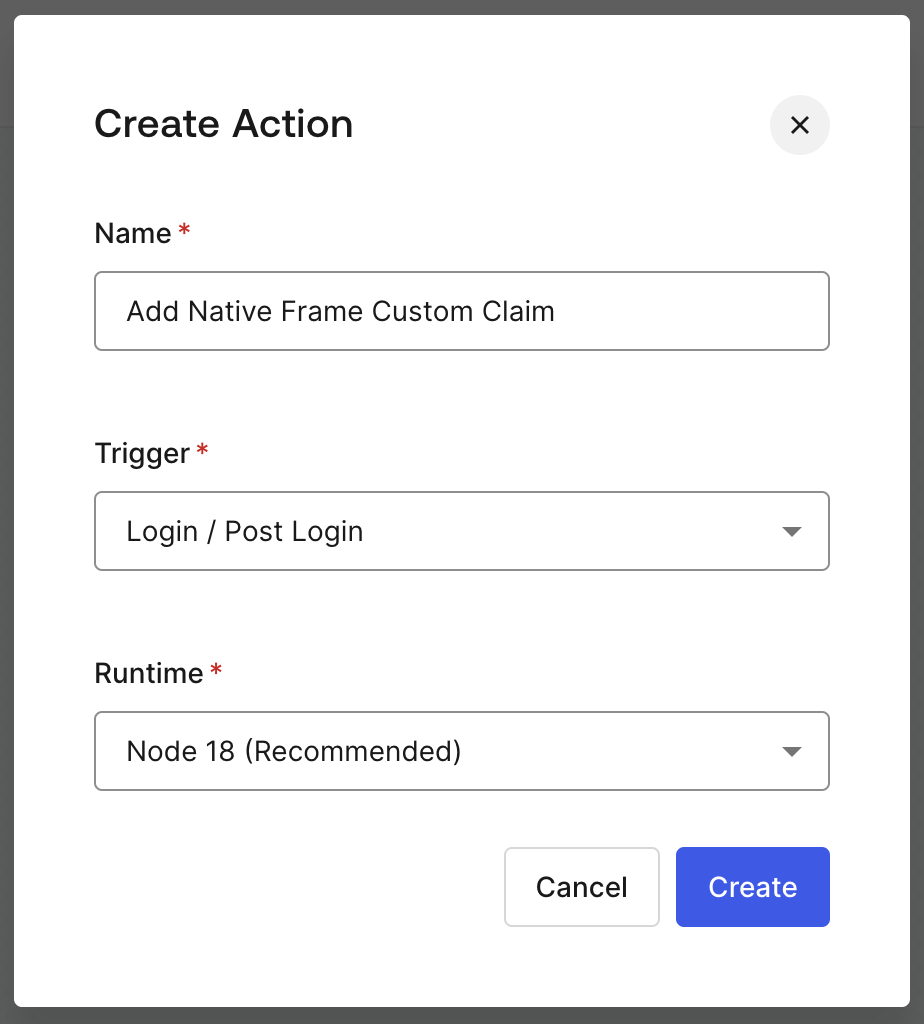
Click the “+” button to create a new action and select “Build from scratch”
-
Add into the "Name" field this text: "Add Native Frame Custom Claim"
-
Paste the following code into the Auth0 custom action editor
const createVideoClaimBroadcaster = async (event, api) => {
  const res = await fetch(
    `${event.secrets.NativeFrameHost}/program/api/v1/projects/${event.secrets.NativeFrameProjectID}/streams?projectId=${event.secrets.NativeFrameProjectID}`,
    {
      headers: {
        authorization: `bearer ${event.secrets.NativeFrameJWT}`,
        "content-type": "application/json",
      },
      body: `{"streamName":"${Date.now().toLocaleString()}","authKey":"some-secret","authType":"private","transcode":true}`,
      method: "POST",
    }
  );
  if (!res.ok) {
    api.access.deny(
      "Unable to create stream:" +
        res.status +
        " " +
        event.secrets.NativeFrameHost +
        " " +
        event.secrets.NativeFrameProjectID
    );
    return;
  }

  const stream = await res.json();
  const t = {
    data: {
      displayName: event.user.given_name,
      mirrors: [
        {
          clientEncoder: "SaaS",
          clientReferrer: event.secrets.NativeFrameProjectID,
          id: stream.id,
          kind: "pipe",
          streamKey: stream.id, // streamId
          streamName: "demo",
        },
      ],
    },
    token: stream.id,
    scopes: event.authorization.roles,
    userId: event.user.user_id,
    expire: "2025-06-06T22:33:31.898626447Z", //TODO: get from event if we can
  };
  api.accessToken.setCustomClaim("@video/token", t);
};

const createViewerVideoClaim = (event, api) => {
  const t = {
    data: {
      displayName: event.user.given_name,
    },
    token: "todo",
    scopes: event.authorization.roles,
    userId: event.user.user_id,
    expire: "2025-06-06T22:33:31.898626447Z", //TODO: get from event if we can
  };
  api.accessToken.setCustomClaim("@video/token", t);
};

/**
 * Handler that will be called during the execution of a PostLogin flow.
 *
 * @param {Event} event - Details about the user and the context in which they are logging in.
 * @param {PostLoginAPI} api - Interface whose methods can be used to change the behavior of the login.
 */
exports.onExecutePostLogin = async (event, api) => {
  if (event.authorization) {
    api.accessToken.setCustomClaim("lively/roles", event.authorization.roles);
    if (event.authorization.roles.includes("broadcaster")) {
      await createVideoClaimBroadcaster(event, api);
      return;
    }
    createViewerVideoClaim(event, api);
  }
};
-
Now we need to add three secrets. On the left side of the editor, click “Add Secret” and enter the following three secrets
-
NativeFrameProjectID- this is the Native Frame project ID you intend to use for this integration- Example:
0190045c-c5d2-728e-abb3-3a2ef898f817
- Example:
-
NativeFrameHost- this is the Native Frame host URLwww.nativeframe.com
-
NativeFrameJWT- this is the JWT we created earlier, at the end of the “Creating a Native Frame Service Account JWT” section
-
eyJhbGciOiJSUzI1NiIsImtpZCI6IjFjNjNlNDE0LWExZjItNDUyNy1hZTRlLTc0N2Y5OGJiNWI5NyIsInR5cCI6IkpXVCJ9.eyJpYXQiOjE3MTgyMTIyMTAsImlzcyI6ImRldjI_cHJvamVjdD0wMTkwMDQ1Yy1jNWQyLTcyOGUtYWJiMy0zYTJlZjg5OGY4MTciLCJqdGkiOiJjcGt0Y3NoYmgwZjhkMG9wc20yMCIsInJvbGVzIjpbInNlcnZpY2UtYWNjb3VudCJdLCJzdWIiOiJ0ZXN0LXVzZXIyIn0.AGsPB402vxL8YkecWUsnYfU7lM_359aCOpqxVhB5vuaSNzeLampNJeh3bpc_DuyWgbu2zuGuKxsW2BOP1KcQdYzeJoJz9XvkGA7GNs0bNlOCKz-trpIctk6YnKEFD0eCuUb7is9QN_Q92hTR2DPChmi91jI3SgCIqSarmwAPHv1P7OalR_sHkwnQsdJ6KcntlSh8YQr8qrNNmxJKToSJCid63T2NsbUf0goi6ipA5S0EckgJt7UVFSBpjiNVebW4JPQD8XksbI-3xNPQkoPLRodMTc9xy9iPn0gblYrHIlZxkpnhKZIpSZmTAIeo8uwcsobRT9ic870OAU6JqogLJw
-
Click “Deploy” to save and deploy the code.
-
Now click “Back to flow” in the top left to navigate back to the flow editor
-
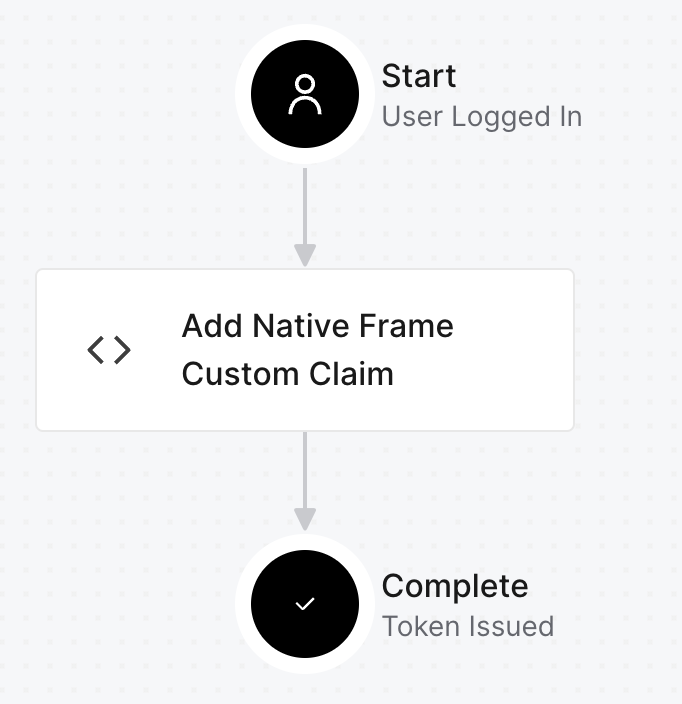
From the login flow, on the right hand side select the “Custom” tab and drag the new action between the “Start” and “Complete” actions
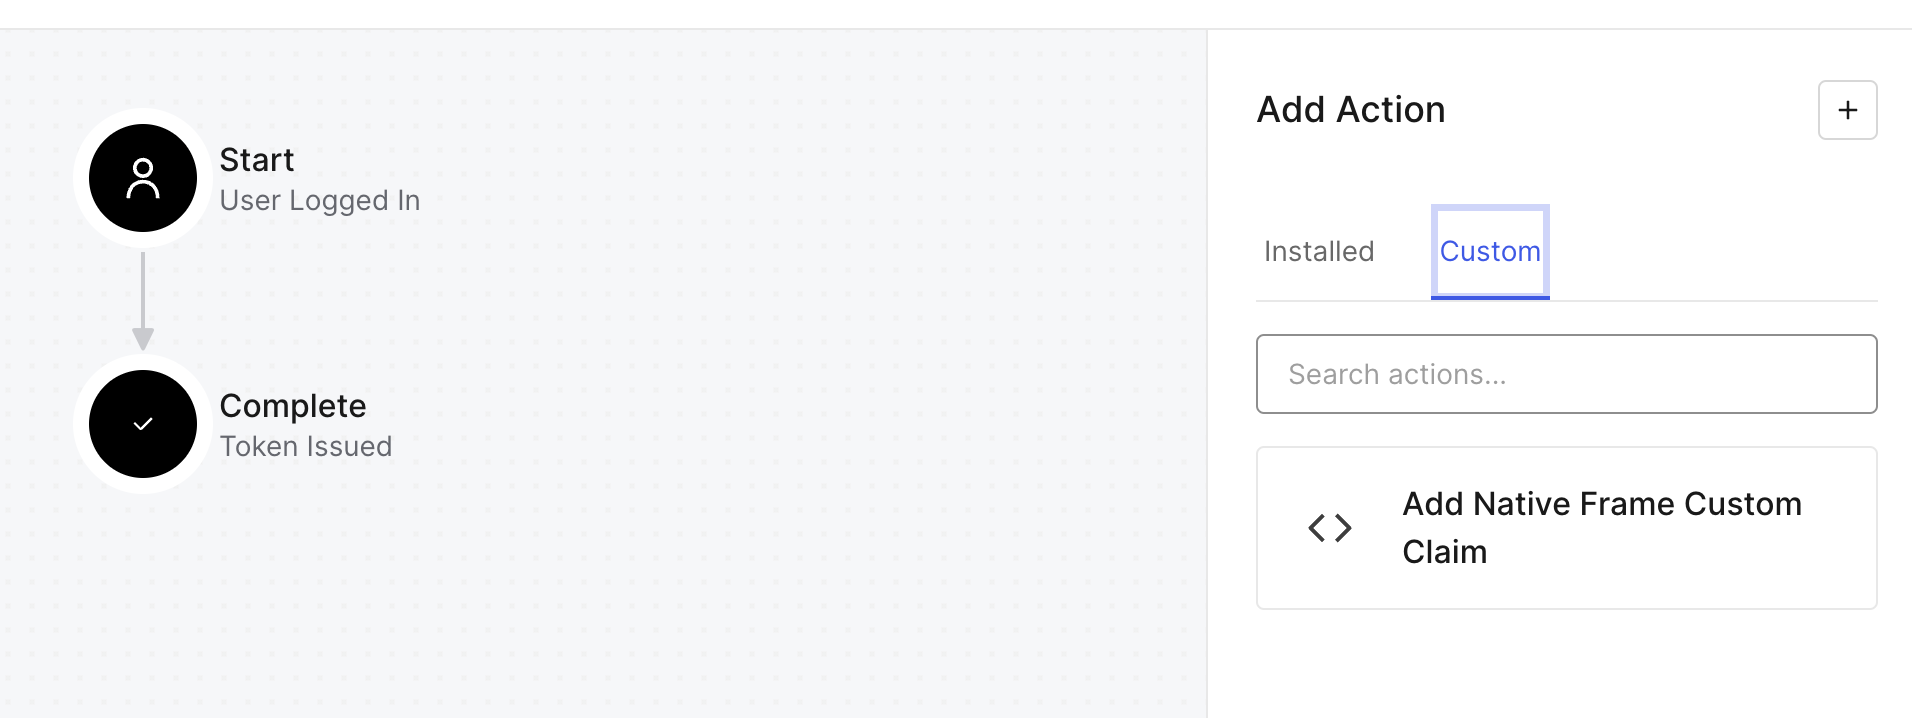
The flow should look like this once complete:
-
Now click "Apply"
Configuring the Demo App
Now that we have the Auth0 apps configured, it's time to test our implementation with the Native Frame demo app. The code for this demo can be found here. Once cloned, follow the steps in the README.
- In the
/client/public/js/globalConfigs.jsfile, populate the following properties found from the Auth0 dashboard (this should be the single page app, not the API app):auth0.domainauth0.clientId- Set
authTypetoauth0
- Save the file and run
npm run startfrom the project root - Navigate to
localhost:3000in a browser and click “Login” - Proceed through the Auth0 login flow, either by email/password or Google
Associate Roles with an Auth0 User Account
Now that we've logged into the app, a user account has been created within Auth0. The last step is to assign the Auth0 roles we created earlier to this new user account.
-
Navigate to the Auth0 dashboard and select “User Management” > “Users” and click on the newly created user account
-
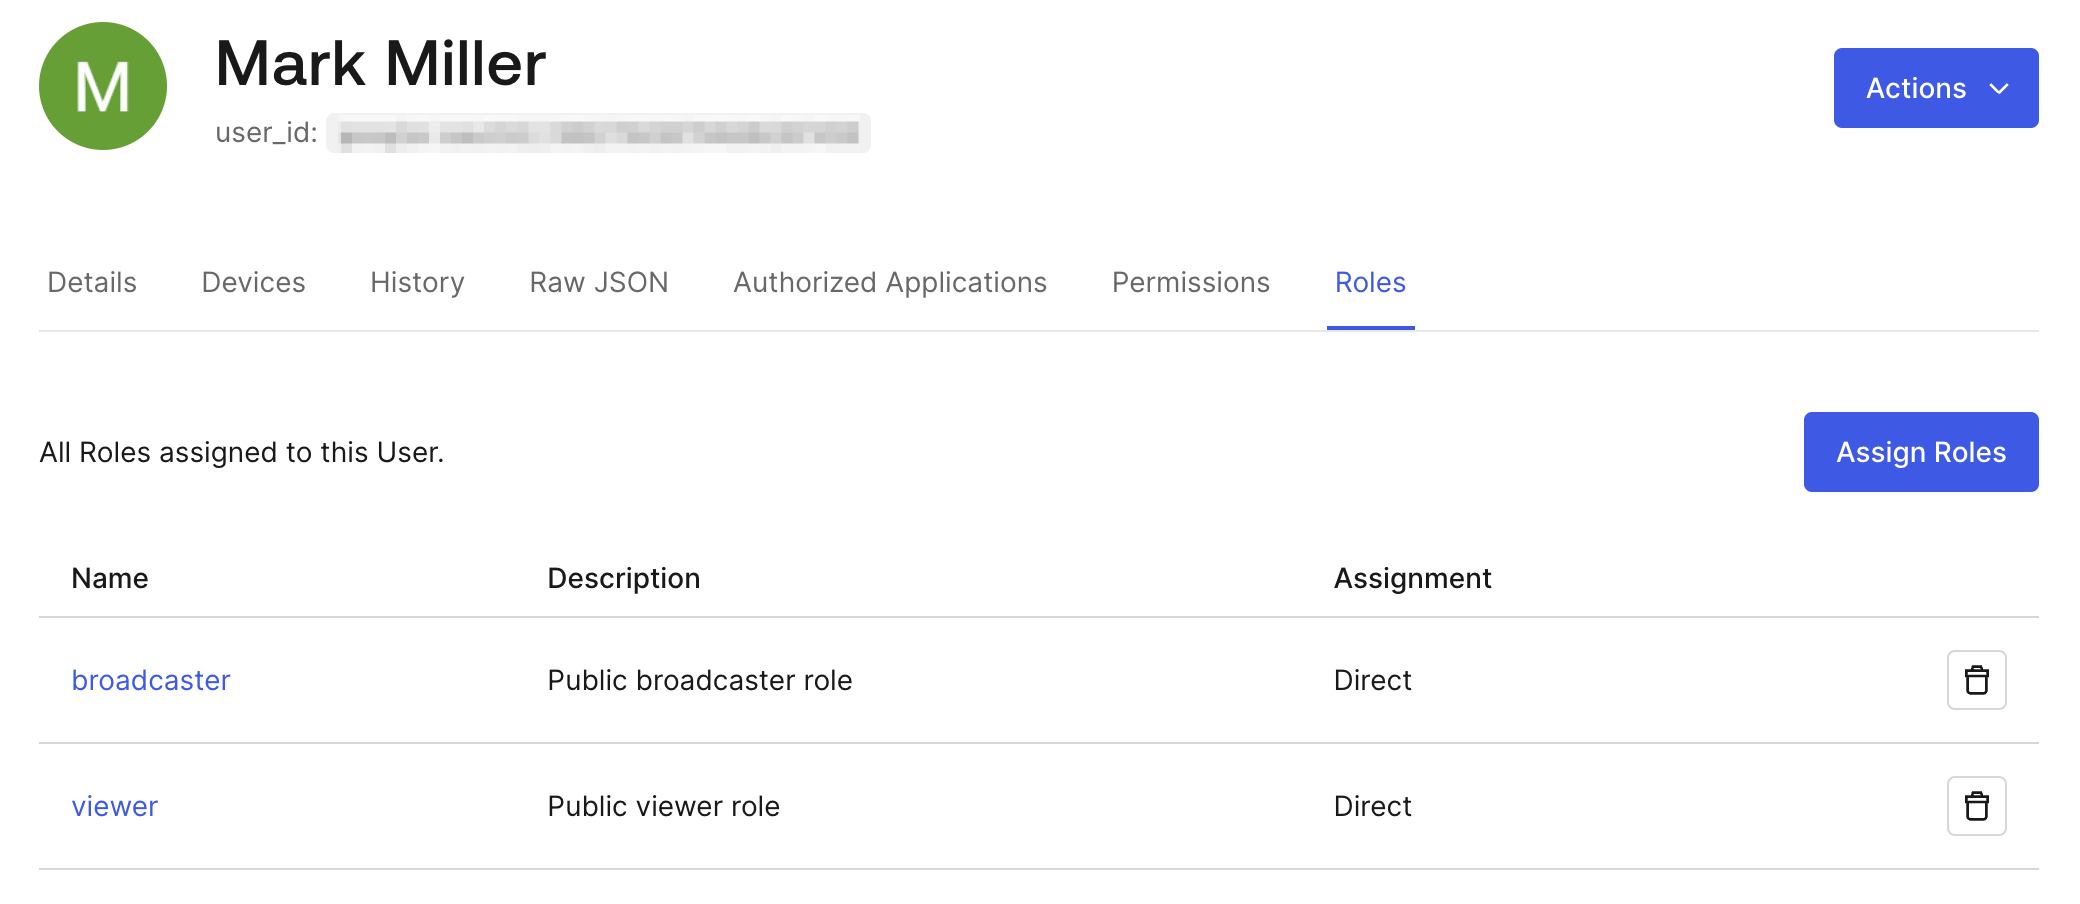
Click on the “Roles” tab and assign the broadcaster and viewer roles
-
Now go back to the demo and click “Logout”
-
Wait a few seconds for the change to take place in Auth0 and login once more
-
Click “Start Broadcast”
-
If everything is working properly, there should be no errors in the browser's console and the “Network” tab should show an active WebSocket connection
If the broadcast failed to initial, verify that the JWT has the correct claim by copying the token from the “Network” tab in your browsers “Dev Tools” and paste it into jwt.io.